
This Post May Contain Affiliate Links. Please Read Our Disclosure Policy.


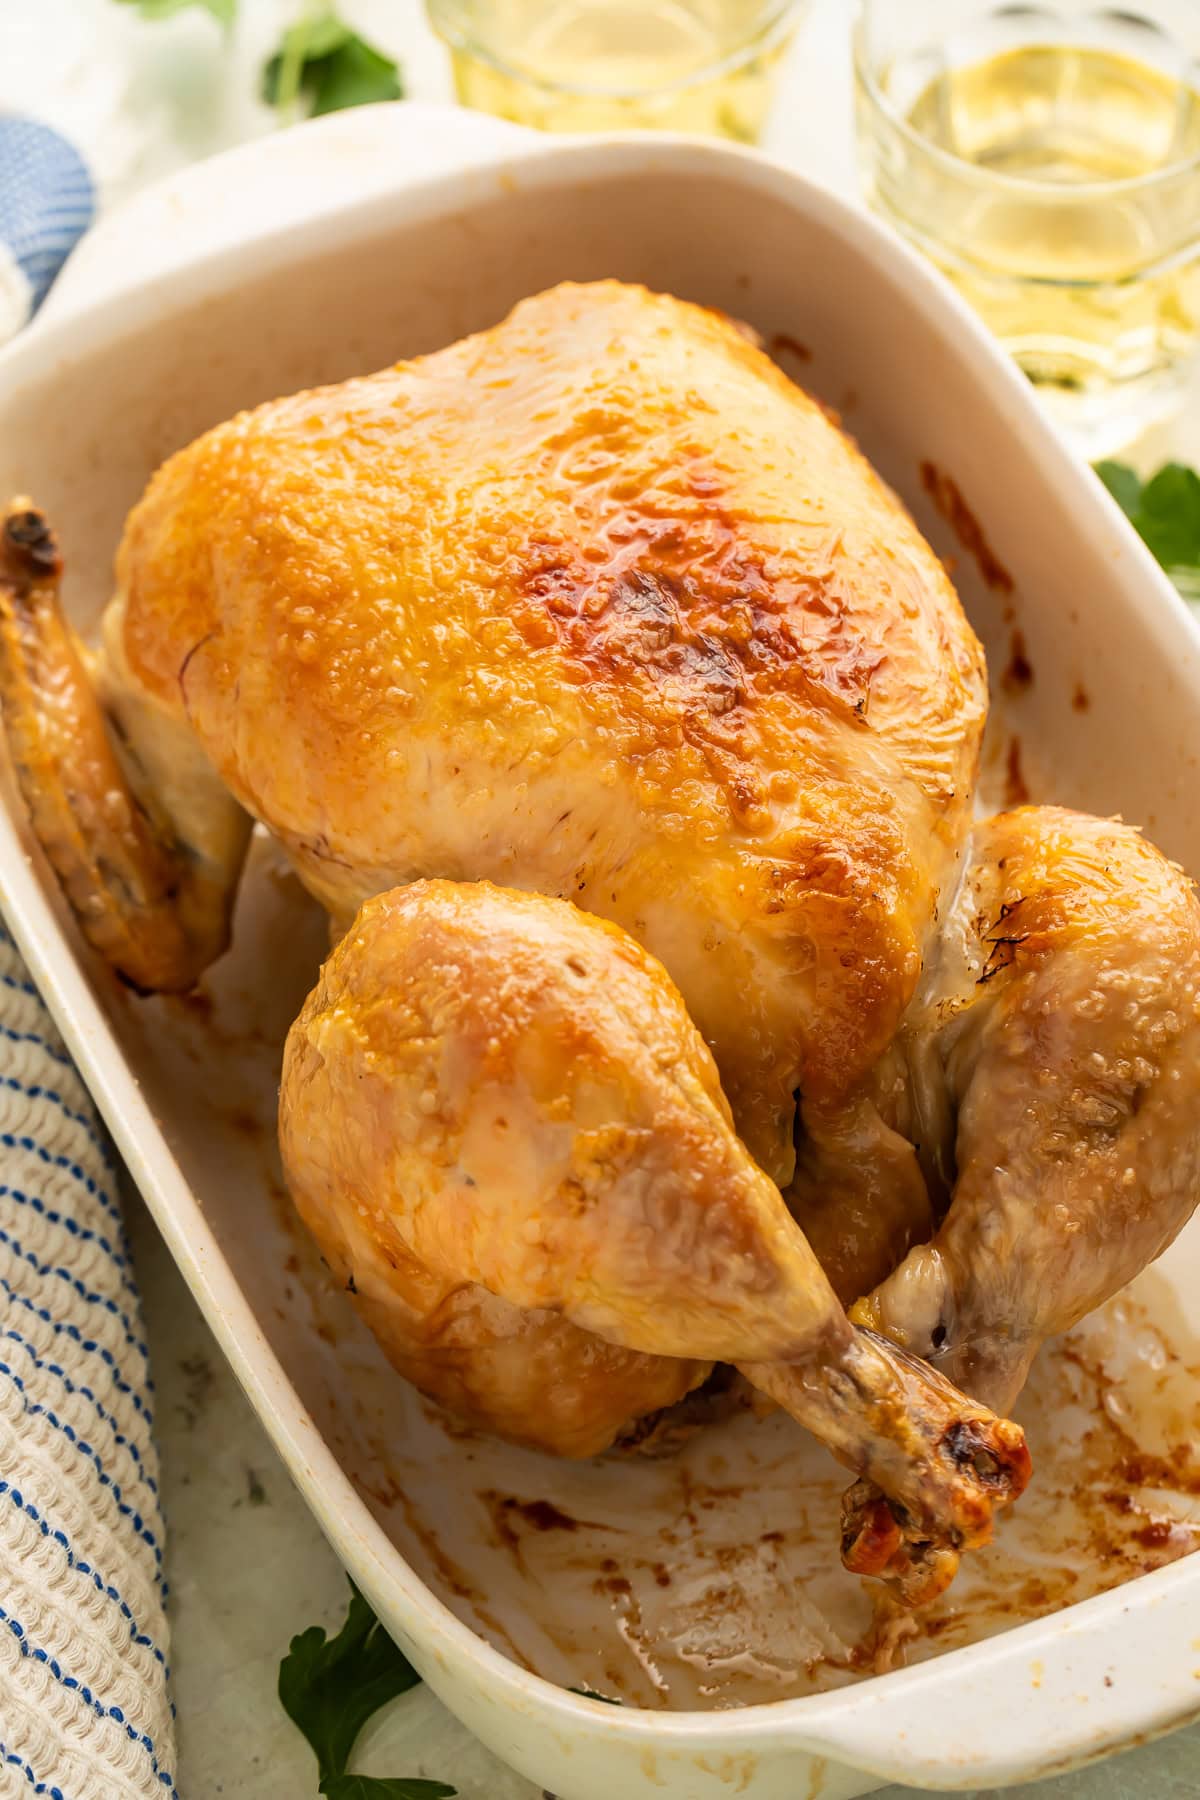
This easy roast chicken recipe is simple and so perfect crispy, beautifully browned skin, tender meat, and savory gravy. It’s so insanely good that your family will become obsessed and demand it every week! (I offer options for both a regular gravy and a Whole30, paleo, gluten-free gravy as well.)

See recipe card below for full list of measurements, ingredients, and instructions.
Why This Recipe is So Good
- Good roasts take at least one hour, right? Not with my whole chicken method! It requires only a few steps and is done in under an hour — it’s insanely easy, and produces super crispy skin and tender meat!
- This chicken and gravy recipe is the perfect way to have cooked chicken for other recipes or your kiddos’ lunches. Some of my faves where you can add pre-cooked chicken are Restaurant-Style Chicken Fried Rice, BBQ Chicken Salad, Black Pepper Chicken, and Mexican Chicken Soup
- You could make this whole roasted chicken each week—I do! We eat the chicken as is the first night, then I strip the chicken of the cooked meat and save it for another recipe a day or two later. Finally, I use the bones in my Instant Pot bone broth recipe – talk about efficiency!
More Recipes You’ll Love
What You Need to Know Before You Start
- Don’t forget to truss the entire chicken! Trussing is a technique used to tie the legs and wings of a bird (typically chicken or turkey) to the body to ensure even cooking. Not only that, it prevents the cavity from being too open and wide, which allows too much hot air to circulate inside. Trussing produces super-moist chicken by creating a more even shape and preventing the air cavity from drying out the meat. It’s an absolute must-know technique for any home chef. I outline the method below.
- When it comes to how to cook chicken to perfect moistness, it comes down to not overcooking your chicken and cooking it at the right temperature. Having the right temperature is crucial. The temperature needs to be high enough to crisp the skin and cook the chicken quickly, without overcooking the outside, near the skin.
- Hence, be sure to cook the chicken to the right internal temperature and not overcook it. I highly recommend investing in a thermometer with a probe, since this makes cooking meat and poultry in the oven an absolute breeze. I have a fantastic internal thermometer that has a probe I insert in my chicken near a bone (the coldest part) when it’s in the oven. I set the desired temperature (161º F) on the digital display, and the thermometer beeps when it reaches that temperature. I take the chicken out and voila, absolute perfection every time!
Cheryl’s Tip: Meat and poultry cook from the outside in; we’ve all seen chicken that’s not done in the center when you cut into it. Cooking chicken to the right temperature means that the meat towards the outside of the chicken, near the skin, is already at the proper temperature before the meat by the bone can reach it. So, overcooking chicken means you’re really, really overcooking the meat towards the outside, near the skin. Don’t do this!
How to Truss a Chicken?
There are actually several ways to truss a chicken, but my method is super easy. Long story short, I always forget which string goes where with other, more complicated techniques, so I’ve Here’s how you do it:
- Cut a piece of kitchen string about 1 meter long, or about 3 feet. Place it centered in your cast iron skillet or roasting pan, about 2/3 from the top. Place your chicken centered on top. The string should hit right above where the top of the leg is on the chicken.
- Pull the string up, over, and down the legs. Cross the strings over each other then pull each side over and around the end of the legs, essentially crossing the legs over each other. The legs should be tied together tightly. Tie the string together at the top of the crossed legs in a bow.
Now work on the wings: You can truss the wings to the body of the chicken by starting the string up along the middle of the wings and simply pinning the wings to the body when you bring it up and around the body and over the legs. However, I prefer the following method of working on the wings:
- I take the wing tip and pull it up and back, pinning it behind the body of the turkey. Repeat with the other side. Your own arms will feel uncomfortable out of sympathy for the chicken, and that’s when you know it’s right. It’s super simple, though, really: simply push the wing tips back behind the body and tuck them there.
Ronny from Primal Gourmet has a super helpful video showing his very similar method for trussing a chicken. Check it out if you need a visual by clicking here!

Frequently Asked Questions
Start by removing the giblets and neck from the cavity, then pat the chicken completely dry with paper towels – this is crucial for crispy skin! Season the cavity with salt, then truss the chicken using kitchen twine. Here’s the simple method: place a 3-foot piece of string centered under the chicken in your pan, pull it up and over the legs, cross the strings, then tie the legs together tightly. For the wings, pull the wing tips up and back, tucking them behind the body. Trust me, proper trussing is what makes this the best roast chicken ever – it ensures even cooking and prevents the meat from drying out.
For a 3-3.5 pound chicken at 450°F, roast for 50 minutes or until the internal temperature reaches 161°F. Here’s the timing for different-sized birds:
– 2.5-3 lbs: 45-50 minutes
– 3-3.5 lbs: 50-55 minutes
– 3.5-4 lbs: 55-65 minutes
– 4-4.5 lbs: 65-75 minutes
I seriously can’t stress this enough – use a digital thermometer with a probe! It takes all the guesswork out and guarantees perfectly cooked chicken every single time.
After removing the chicken, you’ll have amazing drippings in your cast iron skillet – don’t waste them! Pour out all but 3 tablespoons of drippings, then whisk in your thickener. For regular gravy, use 3 tablespoons flour and whisk until golden brown. For Whole30 and paleo gravy, use 4 tablespoons arrowroot powder or 3 tablespoons cassava flour (cassava flour gives the best texture, trust me on this!). Gradually whisk in 2½ cups chicken stock until smooth, season with salt and herbs, then simmer until thickened. The key is whisking constantly to prevent lumps!
Getting that perfectly crispy, golden-brown skin comes down to three essential things:
1. A dry environment – Pat your chicken completely dry with paper towels before seasoning
2. Cooking at the right temperature – 450°F is the sweet spot for crispy skin without overcooking.
3. Oil on the skin – Pour that avocado oil generously over the entire chicken and rub it in
This recipe nails all three factors, which is exactly why you’ll get the crispiest skin you’ve ever made at home. Don’t skip any of these steps – they’re all dang important for that restaurant-quality crispiness!
I roast chicken at 450°F because it’s the perfect temperature for crispy skin and juicy meat. The high heat crisps the skin beautifully while cooking the chicken quickly enough to keep it tender. For different-sized chickens, stick with 450°F but adjust the timing:
– Smaller chickens (2.5-3 lbs): 45-50 minutes at 450°F
– Standard chickens (3-3.5 lbs): 50 minutes at 450°F
– Larger chickens (4+ lbs): 60-75 minutes at 450°F
Always cook to an internal temperature of 161°F in the thickest part of the thigh – this ensures the chicken is perfectly done without being overcooked and dry.
I like to use arrowroot powder in my recipes, since it’s relatively easy to find and seems to be a staple in most Whole30 kitchens. However, it does produce a fairly gelatinous look to what it thickens, this gravy included. While it will have a normal texture in taste, it might look a bit funny glopping about when you pour it!
If you have cassava flour, I highly recommend using 3 tablespoons to make the gravy in this recipe, rather than arrowroot powder. Cassava flour can be a bit harder to find still, but it is the closest grain-free flour to all-purpose flour that I’ve found.
I recommend roasting your chicken in a cast iron skillet, as it, for some reason, produces a more golden brown skin, and it’s much easier to make your gravy in afterwards. I love that it’s super heavy-duty and the perfect size for a roast chicken, too. Did I mention the gravy?! I prefer a 12-inch cast-iron skillet, which I use daily for everything from breakfast to dinner!
For this cooked roast chicken, it can be stored for 3-4 days when kept in an airtight container in the refrigerator at 40°F or below.
For longer storage, cooked chicken can be frozen for up to 4 months for best quality.
More Delicious Chicken Recipes
- Whole30 Marry Me Chicken (Paleo, Dairy Free)
- Mississippi Chicken Pot Roast
- Creamy Ranch Chicken
- Cheesy Pesto Chicken
- Chicken Divan
- Buffalo Chicken Bowls
- Bruschetta Chicken
- Marry Me Chicken (Chicken in a Sun-Dried Tomato Cream Sauce)
- Greek Chicken Skillet with Orzo, Feta, and Spinach
- Honey Sriracha Chicken
- Creamy Cajun Chicken Skillet
- Baked Italian Dressing Chicken (Only 2 Ingredients!)
Making changes to a recipe can result in recipe failure. Any substitutions or variations listed are simple changes that I believe will work in this recipe, but results are not guaranteed.

Best Roast Chicken with Homemade Gravy
Equipment
- 12-inch cast-iron skillet
- kitchen twine about 3 feet/1 meter long for trussing
- Digital meat thermometer with probe
- Large whisk
- Cutting board
- Sharp knife
Ingredients
- 1 3-3.5 pound chicken giblets removed
- 2 tablespoons avocado oil or other oil with a high smoke point
- 1 teaspoon salt plus more
- 3 tablespoons drippings or fat of choice like butter or oil
- 3 tablespoons flour
- 2 ½ cups chicken stock
- ½ teaspoon salt
- 1 pinch dried thyme or sage if desired
- 4 tablespoons arrowroot powder or 3 tablespoons cassava flour or all-purpose (see note)
- 2 ½ cups chicken stock
- ½ teaspoon salt
- 1 pinch dried thyme or sage if desired
Instructions
- Preheat oven to 450º F, 232º C.
- Remove giblets and neck from cavity of chicken then season the cavity with salt. Next,
- Truss your chicken.
Truss Your Chicken
- Place a piece of kitchen twine about 1 meter long centered in your cast-iron skillet. Place the chicken on top, breast up, and bring the twine up and over the legs, down along the crease where the leg meets the body. Run twine under ends of legs and then pull twine to meet, crossing legs and pulling very tight. Tie a knot and finish with a bow. Take wing tips and pull them up and behind the body of the chicken, tucking behind the body. See our post on How to Truss a Chicken if you're unsure about this step!
- Pour oil over the chicken and sprinkle liberally with lots of salt.
- Place chicken in oven and roast for 50 minutes, or until internal temperature is 161º F. It will take slightly longer for bigger chickens, which is why I highly recommend a digital thermometer with an internal probe.
- When internal temperature reaches 161º F, remove from oven and carefully transfer chicken to cutting board to rest.
Make Gravy
- If you’re on a Whole30 or are paleo, gluten-free, or grain-free, use the ingredients under the “Whole30/Paleo Gravy” heading. Otherwise, use the ingredients under the “Gravy” heading.
- Carefully place cast-iron skillet on stovetop, making sure to always use a pot holder to touch the handle from this point on. Pour out all but 3 tablespoons drippings then sprinkle flour, cassava flour, or arrowroot powder over. Whisk constantly until smooth and golden brown, then gradually pour in chicken stock, whisking constantly until incorporated. Season with salt and thyme or sage. Simmer until slightly thickened, a few minutes.
- Carve chicken and serve with plenty of gravy.
Approximate Information for One Serving
Nutrition Disclaimers
Number of total servings shown is approximate. Actual number of servings will depend on your preferred portion sizes.
Nutritional values shown are general guidelines and reflect information for 1 serving using the ingredients listed, not including any optional ingredients. Actual macros may vary slightly depending on specific brands and types of ingredients used.
To determine the weight of one serving, prepare the recipe as instructed. Weigh the finished recipe, then divide the weight of the finished recipe (not including the weight of the container the food is in) by the desired number of servings. Result will be the weight of one serving.
Did You Make This Recipe?
Tag @40aprons on Instagram and be sure to leave a review on the blog post!
Never Miss A Meal!
New Recipes Straight To Your Inbox
A curated selection of our most recent recipes, delivered straight to your inbox once a week.


Wow!!!! Great chicken recipe! You can really season to your liking….I sprinkled the chic with poultry seasoning.
Best part is how tender the chicken meat is!
Thanks
Thank you, Mark, for sharing your review with us! We really appreciate it, and I’m so happy you enjoyed the roast chicken!
Wow!!!! Great chicken recipe! You can really season to your liking….I sprinkled the chic with poultry seasoning.
Best part is how tender the chicken meat is!
Thanks
This turned out delicious! Thanks for the recipe. I threw some rosemary into the gravy, and it just put it over the top. So simple, will definitely become a regular meal in our house.
This chicken came out INCREDIBLE! Wow, I can’t believe how juicy and delicious it was, and it’s already a family favorite. I can’t believe how easy it was! I have one concern for mess/clean up though – my oven is a disaster during after I roast it with the oil spraying everywhere. I wanted to know what your opinion is wrapping the chicken and roast pan with foil? How does this affect the crispness of the skin and also cooking time?
It will definitely affect the crispiness if you cover it COMPLETELY, but if you put foil around the sides like a wall but not completely covering the chicken, it will help with that splatter. I also like to leave a baking sheet underneath and hope it catches most of the splatter. Hope that helps!
That’s a great tip thanks so much!