
This Post May Contain Affiliate Links. Please Read Our Disclosure Policy.
 After last week’s Nutella, did you really think I could leave cronuts away? Not possible!
In case you’ve been “unplugged” for the last year, cronuts are a mix between flaky, layered croissants and yeasty, deep-fried donuts. Sound amazing? Well…
they are. They really, really are. The only trouble is that they’re absolutely laden with butter and other various dairy products, making them a no-no for vegans, if you can even find them! They’re based primarily out of New York–yeah, the pastries that people wait hours in line for–but now you can make them at home on your own time! No butter or Candy Crush marathons necessary. I mean, really, what else would you do in line that long? I digress.
You might know that I work with Tofutti to bring you delicious vegan dishes using their dairy-free products. I’ve been using Tofutti for almost ten years now, which made the partnership extremely special! Well, I was talking about trendy food concepts and their mind-blowing vegan Greek yogurt recipe, when it struck me: I have to make these “flaky donuts” at home. While we can’t call them by their trademarked name, we can call them “flaky donuts”. I mean, does a rose by any other name…? Yeah, you get it. VEGAN “FLAKY DONUTS”, PEOPLE. Vegan “flaky donuts”.
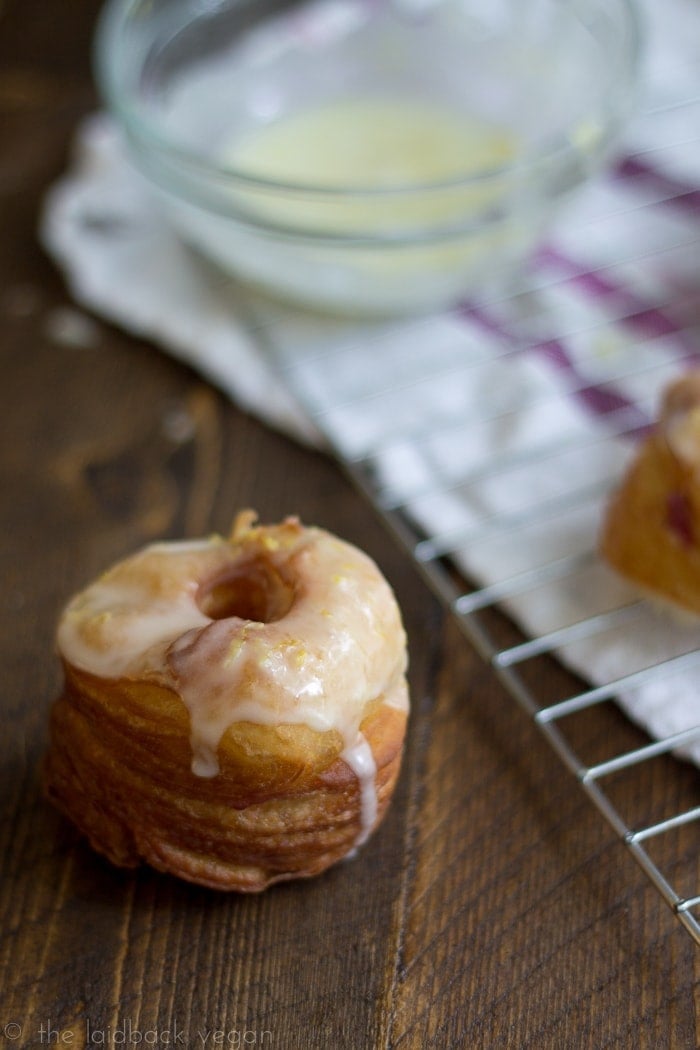
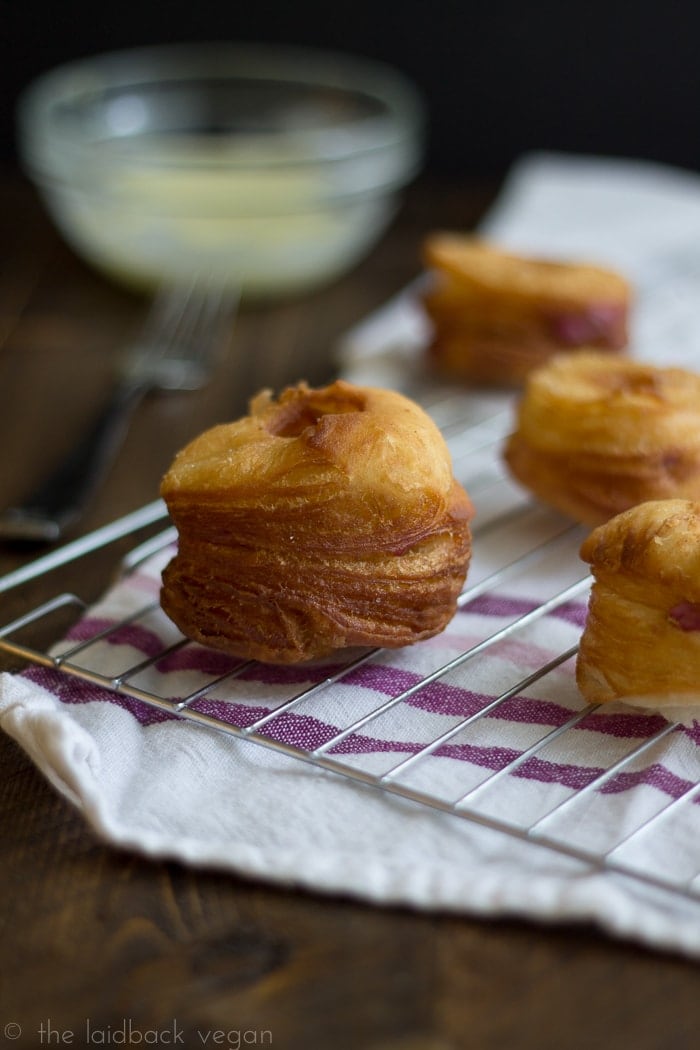
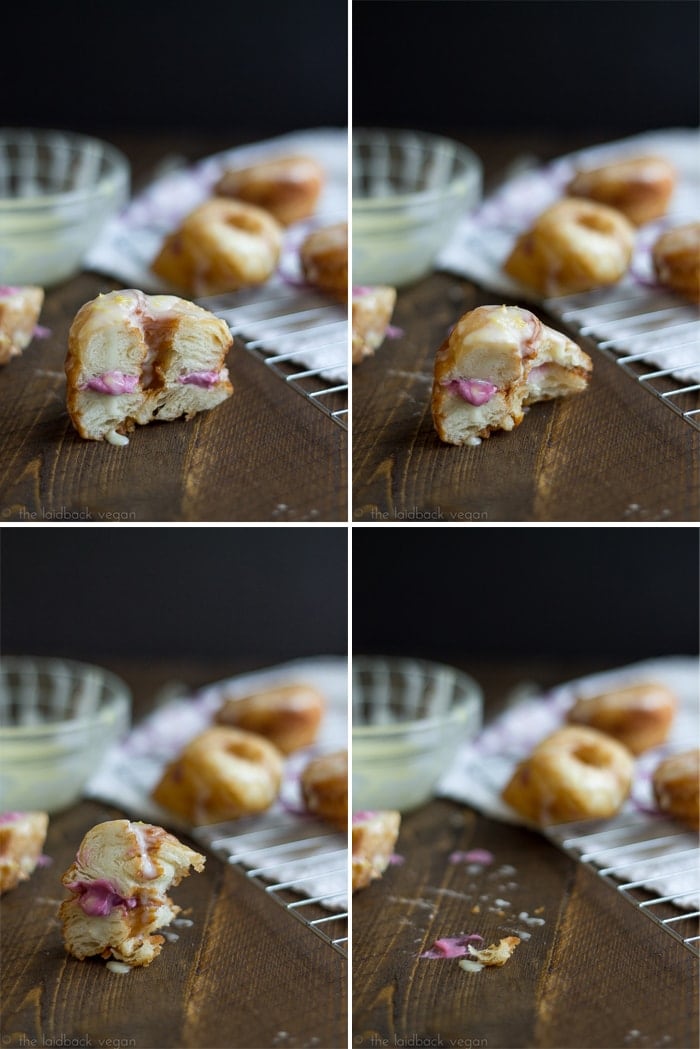 I’d heard tall tales of their intrigue, their otherworldliness. But, of course, being quite far from New York and not very much a fan of butter, I figured I’d have to make them myself to ever taste the suckers. Finally, the perfect chance presented itself.. and I’m so glad it did. They are of course flaky and deliciously deep-fried, but they’re at the same time tender, the perfect balance of fluffy yeast dough and buttery layers, filled with a fruity sweet-tart cream, topped with an aromatic citrus glaze. The blackberry-cream cheese and lemon glaze are brilliant on their own–sandwich a “flaky donut” in there and you’re basically in culinary heaven, rubbing elbows with Julia Child and Fernand Point.
I won’t pretend that these are quick or easy–they’re not. While they’re not exactly difficult, the recipe takes quite a lot of diligence, measuring, and patience. That being said, the active time is actually quite small, and the outcome is so, so worth it!
You will need a very long, thin pastry tip or injector to aid in the filling of these bad boys, but I made do with a Ziploc-bagged contraption and a long thin pastry tip that I use for eclairs.
Vegan "Flaky Donuts" with Blackberry-Cream Cheese Filling and Lemon Glaze
Ingredients
- 4 cups all-purpose flour
- ⅓ cup sugar
- 1 ½ teaspoons salt
- 1 ½ tablespoons softened vegan butter
- 1 cup water
- ½ cup alt-milk like almond or soy; coconut might impart a “coconutty” taste here
- 1 tablespoon dry active yeast
- 1 cup vegan butter room temperature yields the “butter” too soft here; give vegan butter from a tub a few minutes on the counter before working with it, while the sticks need about 20 minutes on the counter, soft enough to work with
- 2-3 cups oil for frying
- ½ cup Tofutti Better Than Cream Cheese
- 2 tablespoons blackberry jam
- ½ cup powdered sugar
- ¼ juice juice of 1/4 lemon
- 1 zest zest of 1/4 lemon
Instructions
- In a small microwave-safe bowl, heat milk and water for a few seconds in the microwave until lukewarm. Whisk in the yeast and let stand about 5 minutes, or until the mixture begins to bubble.
- To a stand mixer bowl add the flour, sugar, salt, 1 1/2 tablespoons softened vegan butter, and yeast mixture, and mix with paddle attachment until just combined, about 30 seconds to a minute. Scrape down sides of the bowl (if necessary) and mix again for another minute. Form a ball from the dough and place in a greased bowl. Cover with a damp, clean towel or with plastic wrap and place in a warm spot. Let rise until doubled in size, about 45 minutes to an hour. Punch down the dough, wrap, and chill for an hour.
- Meanwhile, place the cup of vegan butter between two pieces of wax or parchment paper. With a rolling pin, flatten and shape into an 8-by-8-inch square. If the vegan butter becomes quite soft, place in the freezer for about 10-15 minutes to make it easier to work with.
- Roll out the chilled dough on a lightly floured surface into a 12-by-12-inch square. Place the butter square on the top of the dough square so the corners of the butter square point to the sides of the dough square 

Fold the corners of the dough over the butter block to meet in the center and pinch edges of dough together so the seams are sealed and the butter block is completely enclosed and sealed into the dough.
If dough is very soft and vegan butter is very mushy, place on a plate, cover with plastic wrap, and place in the freezer for about 15 - 20 minutes. Roll out the dough into a 20-by-8-inch rectangle. Brush off excess flour and fold dough into thirds, like a letter.
Cover with plastic wrap and chill for 45 minutes, then move to the freezer for 15 minutes. Repeat the folder, chilling, and freezer process 2 more times.- After the dough’s final fold, chilling, and freezing, roll out onto a lightly floured surface into a 6-by-18-inch rectangle. Use a dough cutter or pizza cutter to cut the dough into three 6-by-6-inch squares and stack the squares on top of each other. If the vegan butter is feeling mushy at this point already, give it a quick freeze and come back! Roll out the stacked squares into a 6-by-8-inch rectangle. Trust me—all of this folding, rolling, stacking, chilling, rolling, stacking, folding creates those deliciously flaky layers!
- Finally, cut 12 donut shapes out of the dough using donut ring cutters or a 3”-diameter circle mold or cookie cutter and 1”-diameter mold for the 'flaky donut' “hole”. Place on a parchment- or wax-paper-lined baking sheet. Cover the donuts loosely with plastic wrap and let rise in a warm place about 30 minutes. Transfer to the freezer and chill for about 10 to 15 minutes.
- Meanwhile, preheat oil in a large pot or very large cast iron skillet, at least 2” deep, to 350ºF. Make your filling: in a blender, food processor, or by hand, mix together cream cheese and blackberry jam until very smooth. Place mixture in a piping bag with a long, thin tip attached, or in an injector. Make your glaze: with a fork, mix together all ingredients—powdered sugar, lemon juice, and lemon zest. Cover with plastic wrap and set aside.
- Once your dough has risen and your oil is heated to 350º, begin to fry donuts, in batches. Don’t crowd! Place on a paper-towel-lined plate to cool.
- Insert long, thin piping tip or injector into the side of your 'flaky donut' and fill a little; repeat this process three more times at regular intervals until 'flaky donut' is “filled”. Repeat with remaining 'flaky donuts'. Finally, glaze your 'flaky donuts': either drizzle glaze with a fork over filled 'flaky donuts' or dip tops-down in a bowl of glaze then let dry on a cooling rack. Devour!


....she says, as she looks away suspiciously. Adapted from loosely from About.com
Approximate Information for One Serving
Nutrition Disclaimers
Number of total servings shown is approximate. Actual number of servings will depend on your preferred portion sizes.
Nutritional values shown are general guidelines and reflect information for 1 serving using the ingredients listed, not including any optional ingredients. Actual macros may vary slightly depending on specific brands and types of ingredients used.
To determine the weight of one serving, prepare the recipe as instructed. Weigh the finished recipe, then divide the weight of the finished recipe (not including the weight of the container the food is in) by the desired number of servings. Result will be the weight of one serving.
Did You Make This Recipe?
Tag @40aprons on Instagram and be sure to leave a review on the blog post!
Make sure you check out Tofutti’s blog and support those who support the Laidback Vegan!
Recipe adapted from About.com’s article.
Never Miss A Meal!
New Recipes Straight To Your Inbox
A curated selection of our most recent recipes, delivered straight to your inbox once a week.


Are these cronuts able to be air fried? I am trying not to use a lot of oil. They look so good. I’ll probably try even if they can’t be air fried😄
We imagine they could be, but to be fair we haven’t tested this method. If you try it, let us know how it turns out! You could also bake them.
i don’t understand how to pipe the filling into these. I wish you had a picture. Do I go around the whole cronut or do I keep inserting into the same hole?
Go around the cronut, inserting at intervals, about 4 would be plenty!
I would so eat these for breakfast, lunch, and dinner. Would that be bad?? They look heavenly!!
No…..
No, that is not bad. That sounds like the best life ever, just saying. Thanks Lindsay! 🙂
I love this recipe – I baked my “vegan flaky donuts” at 350 deg for about 20 minutes. I should say, I THOUGHT I baked them at 350 deg at 20 minutes; turns out, I baked them for 10 minutes and accidentally went up to 450 degrees for another 10 minutes. The bottoms were slightly brown/burnt, but they were ok! I also recommend if you bake and want them to stand up nice and neat, it’d be beneficial to use an aluminum or some type of enclosure so they don’t tip over like Piza.
In the mean time, I have discovered that I have an issue making flaky things: I get impatient when am actually making the circle cutouts, so when I fold what’s leftover, I end up with a biscuit. However! Half did turn out like a poofy “flaky donut” and the other half came out like donut, croissant biscuits. They are now dubbed crisnuts.
Ha! What a story. And great idea on the aluminum enclosures – I had some trouble with them staying straight in the oil and used a chopstick to hold down the fore. Genius idea you had to bake them, first of all, and aluminum would be perfect in the oven. And I’m super impatient when it comes to dough, also.. I always mush pie crust into a ball and it comes out just totally… wonky. Crisnuts, however, sound the opposite of wonky. Glad you liked!!
Oh my! These are perfect. Can’t wait to try making them c:
🙂 Let me know how you like them if you do!
Hello, I don´t understand what to do in point 8 and 9, you have 3 squares 6×6 inches, you stack the squares and roll it to 6×8 rectangles, you mean to roll out every square to that rectangle, or the stacked squarec? Because if I roll it to 6×8 inches, I can´t make 12 donuts 3 inches in diameter, thanks! 🙂
Are you serious with this recipe? I haven’t even tried a cronut yet and now I have to try vegan cronuts with blackberry cream cheese filling AND a lemon glaze! You are killing me with those flavors and that flaky, fluffy looking cronut. Beautiful photos 🙂
Serious as a heart attack! Haha, seriously, though, because these would probably give you one, if you made them at all regularly. They’re SO GOOD, though, ugh! I’d never had a cronut either, before these, but man, worth the hype. Thank you girl 🙂 And congrats!
These are amazing. You are amazing. No seriously, I can not get over how perfect they look!
Unfortunately, the Tofutti link is not working for me. I will just keep drooling until then!
Thank you!!! I was pretty happy with how they came out.. I literally spent about two days working on these (letting them chill WAY longer than just an hour most times) and was so certain they’d totally fail. Ha! I updated the post to include the recipe here, check it out!